The mixing desk is the heart of the sound system. From this complicated looking piece of hardware the person at the back can control the volume of all the microphones, the tone and effects levels and the output volume to the amplifiers.
Any description of a mixing desk has a lot of words. You can read the description, but to understand how it works you really need to play with it and listen to how the sound changes.
The desk can be divided into two sections. Input and Output.
Each microphone/instrument has its own input channel. Mixers come with input channels usually in multiples of 4, so a small system like a church with pulpit and lectern microphones might have 8 or 12 channels while a larger setup with a band or praise group would have maybe 48 or 56 channels.
It's better to be looking at spare channels than looking for extras, so be as generous as your budget will allow.
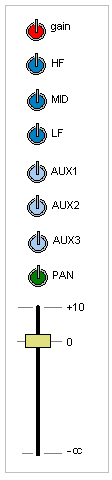
A basic mixer input section is shown on the left. Here's what each knob does.
Gain: This is the input volume of the microphone. Some microphones are more sensitive than others, so the input needs adjusted to an optimum level. Most mixers have a 'peak' light and if the gain is set correctly this will flicker on very occasionally when the person speaks loudly. The gain can also be adjusted to give you greater freedom of movement in the output slider.
HF, MID, LF: Tone controls, like on your hi-fi. high frequency can be turned up to improve clarity, or down to decrease sibilance (sssss sounds). Low frequency or Bass can be turned up to add 'warmth' or down to reduce 'muddiness'. You have to take time to play around with these, become familiar with what they do on your own system and listen to what happens when you make changes.
AUX: Auxiliary outputs. You can use these to set the levels to devices like loop systems, tape decks or fold back monitor speakers. These are separate from the main slider, but they work in a similar way. They become extremely useful on more complicated systems.
PAN: left/right control. On a live PA system, this should always be in the centre. You don't want people on one side of the building hearing one thing, while those on the other hear something entirely different. We did make use of it on one occasion to control levels above and below a church gallery, but it was fiddly getting the levels right.
Slider: This is the individual Output volume of the channel. If your installation is used for the same things week in/week out, most of the time this is the only control that needs to be moved. Turn up the microphones that are being used, turn them down when they're not. Simple.
That's the basics. Most desks have other options, for example: a low frequency cutoff switch, a channel mute switch, PFL (pre-fade listen), group buttons ... The instruction book that comes with the mixer will give you more details. As usual, make time to play and become familiar with what you've got.
When you've chosen the mix settings of the individual inputs, the output section allows you to set the overall system levels. There's a diagram of a typical output section below.
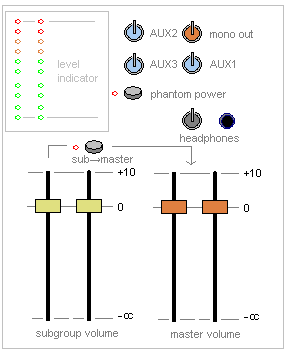
Level Indicator: This displays the overall sound output in lights. When the red lights at the top start staying on, it's time to start thinking about turning something down.
headphones: With Live sound you're not interested in what's coming out the headphone socket. Your aim is to serve the audience or congregation, and unless you're going to issue them all with headphones on the way in there's not much point in you using them (and no, they don't make you look as if you know what you're doing!). They're useful for trouble-shooting if there's a problem, or if you're making tape recordings.
AUX: Auxiliary outputs. You can use these to set the levels to devices like loop systems, tape decks or fold back monitor speakers. These are separate from the mono and Master controls, but they work in a similar way. They become extremely useful on more complicated systems.
Phantom Power: Condenser microphones need +48V phantom power. If you have condenser microphones they won't work unless this power is turned on.
Subgroups: Sometimes it's useful to group signals together. A typical example would be a church praise group. The group can have their own mix, but instead of turning down the slider for each instrument, they can be left set up, and the whole group can be turned down (or off using the sub-master button) together when they're not playing.
mono out: most mixers have left, right and mono master outputs. The mono is a single channel output that ignores all the pan settings.
Master Volume: does exactly what it says on the tin. Slide these most of the way up, allowing yourself a bit of room to boost or cut the volume if necessary.